Ever wondered, how to install android apps on PC without any software?
In this tutorial, I will be telling you how to install android app on PC without any software which means you don’t need any emulator. to run android apps. The process is easy and can be followed easily to run android apps on a PC.
Method 1, Method 2 and Method 3 of installing android apps on PC will work on Windows 11 as WSLg is required for WSA to work ( don’t worry if you don’t get what WSA or WSLg is, I will tell you later in this tutorial when the time comes), which is only available in build 21390 of Windows 11. This means you need to have the latest version of Windows 11 or check the build of Windows and make sure it is above 21390. You can also know by doing check 1 to know if your Windows is compatible to run android apps or not. Don’t worry if your windows fail these checks. We have provided two methods to install the android app on PC without any software with other methods as well in which you don’t have to worry about these checks however, those methods have their own drawbacks.
Firstly, you need to do some checks before moving forward. The first one is the windows compatibility check which is the most important test and the next one is the virtualization check followed by the virtual machine check.
Check 1: Windows Compatibility Check
This is the initial test to know if you can run and install android apps on your PC or not. Windows 11 build 21390 onward has the feature to run android apps. Follow the steps to know if you can run android apps or not:
Step 1: Goto the Microsoft store and search for “Windows Subsystem for Android”. If anything comes up with the same exact name then your window is compatible to run android apps on your PC, however, if not then you can’t run android apps on your PC.
Step 2: Or another way is to simply click on the below link which will take you to the Microsoft store with Windows Subsystem for Android already searched. Now click on “Get in-Store app” which is on the top right. It will ask you to open the Microsoft store to allow it. In the Microsoft store if you don’t get any warning or error then you are ready to move forward.
Check 2: Virtualization
Follow the steps to know if virtualization is turned on or of:
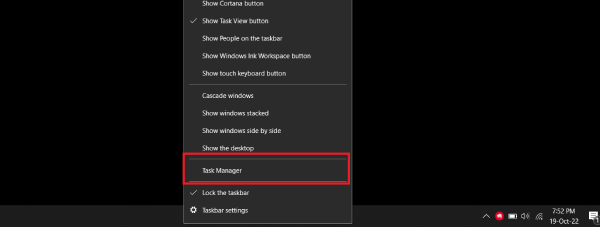
Step 1: Right Click on the taskbar and click on Task Manager
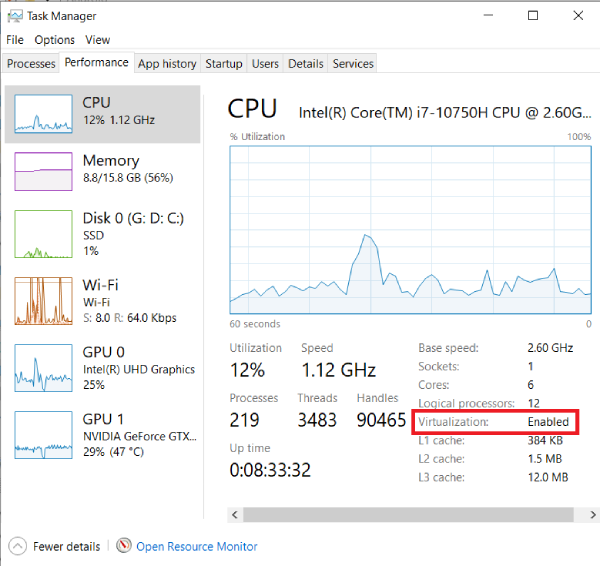
Step 2: Goto the Performance tab and check if virtualization is enabled or not. If it is enabled you are good to go otherwise you need to enable it from Bios/UEFI interface. Here is the tutorial by Microsoft to enable virtualization in Windows 11/10. Enable virtualization on Windows 11 PCs.

Check 3: Virtual Machine Platform
Follow the steps to know if virtualization is turned on or of:
Step 1: Click on Start and start typing window features. Press Enter when you see: Turn Windows features on or off.
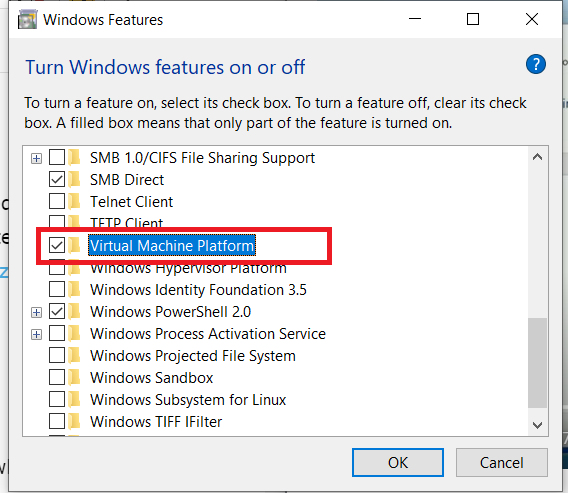
Step 2: Scroll down till you see Virtual Machine Platform and check the box beside it. Click OK. Now you will see that the windows feature will start looking for the required files.
Step 3: Once the Virtual Machine Platform is done you need to Restart your PC.
Now after doing these checks let us move forward to know how to install android apps on PC without any software. You need to follow the below steps:
Step 1: Install Windows Subsystem for Android (WSA)
Window Subsystem for Android (WSA) allows you to install android apps on Windows machines. You can easily install WSA from the Microsoft store. Let me tell you how to do it:
Step 1: Click on the Start menu and start typing Microsoft Store. Press Enter.
Step 2: Once the Microsft Store is open search for “Windows Subsystem for Android with Amazon Appstore”. Click on Install. Or simply visit Windows Subsystem for Android and click on the Get in Store App.
Step 2: Config Windows Subsystem for Android
Once you have installed the WSA you need to configure it. Follow the steps to do it:
Step 1: Click on the start menu and search for Windows Subsystem for Android. Press Enter to open WSA.
Step 2: Click on Developer which is on the left side menu. Navigate to Developer Mode and turn it on.
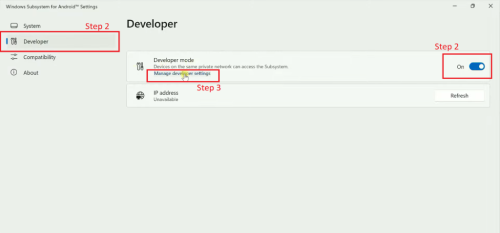
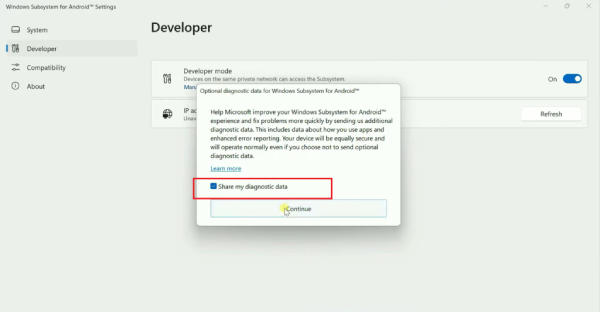
Step 3: Click on Manage developer settings. A pop-up will appear and tick on Share my diagnostic data and press on continue. Once everything is done just close the next dialogue box.
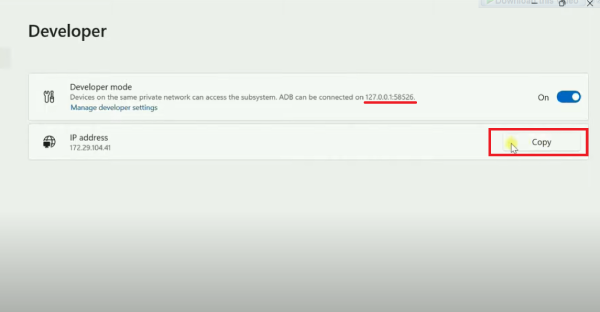
Step 4: Next step is to get the IP address by pressing the refresh button followed by copy button. You will see that the IP address is now shown below the Developer mode heading as well.
Now all the settings are done and you are ready to run android apps on your PC. I will be telling you 3 different methods to install APKs on your PC. You are free to follow any of these.
Method 1: Install APKs with WSA PacMan Tool
WSA PacMan tool is a package manager and installer for WSA. In order to get this tool you need to go to GitHub and get it.
Step 1: Just visit: WSA PacMan Tool GitHub and download it for your PC by going to Assets and clicking on “WSA-Pacman-v1.3.6-installer.exe”. The download will start. Once the download is complete start installing WSA PacMan Tool by double-clicking on the downloaded file and following the prompts.
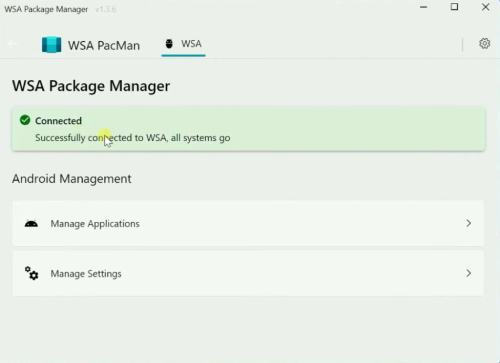
Step 2: Now click on start and start typing WSA PacMan Tool and press Enter to open WSA PacMan Tool. WSA PacMan Tool will open and if everything is fine it will show connected. Close WSA PacMan Tool.
Now you just need to download the APK file of the desired app from a credible and trustworthy third-party website to run it on your PC. In order to download APK you can visit APKMirror, APKPure, or any other website of your choice.
Step 3: Once you have successfully downloaded the desired APK just double-click on it and click on the install button. Don’t forget to click on create a desktop shortcut. Once done open the app. The app will run just like any other software on your PC.
Method 2: Install APKs with the APK installer
This is the other method that you can use to install/run APKs on your PC. Just follow the steps to get it right.
Step 1: Goto the Microsoft store by clicking on the start menu and searching for the Microsoft store. Search for “APK Installer on WSA” app. Click on the install button. Alternatively, go to APK Installer on WSA.
Step 2: Once installation is done click on the open button. You will get a pop-up and an option to open APK files. Click on open APK files and select the desired APK file you want to install on your PC.
You can follow step 2 every time you want to install/run any android app on your PC. You can download APK files on your PC, you need to find a reliable source for the APK and then download it safely.Please note that we are strongly against downloading or installing applications from third-party sources. Such apps may pose security risks, compromise your personal data, or violate app store policies. For your safety and to ensure optimal performance, please use official app stores such as the Google Play Store or the Apple App Store for all downloads.
Method 3: Install APKs with ADB Commands
In order to use this method you need to install SDK Platform Tools. Follow the below steps to do so:
Step 1: Just visit: SDK Platform Tools. Scroll to Download and click on Download SDK Platform Tools for Windows. Follow the prompts.
Step 2: Once the download is complete, extract the downloaded file to the desired location.
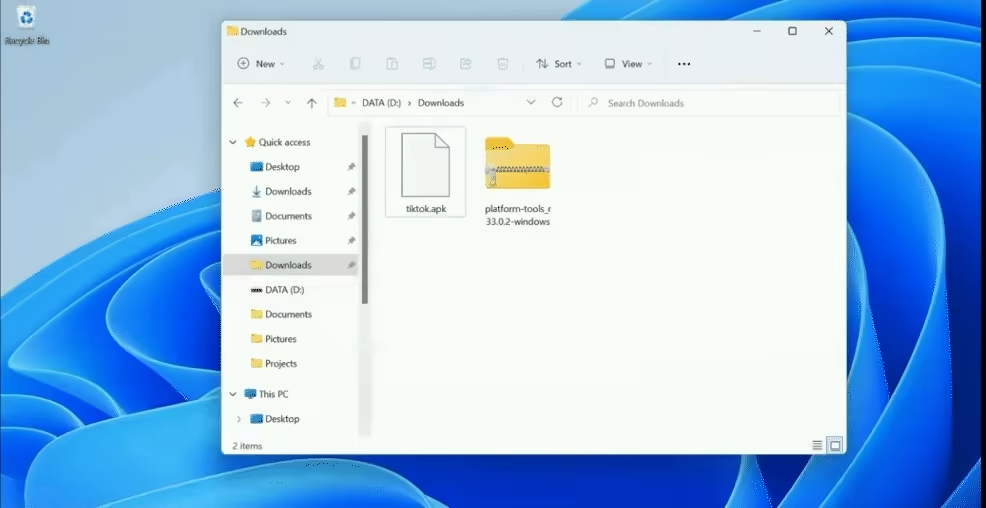
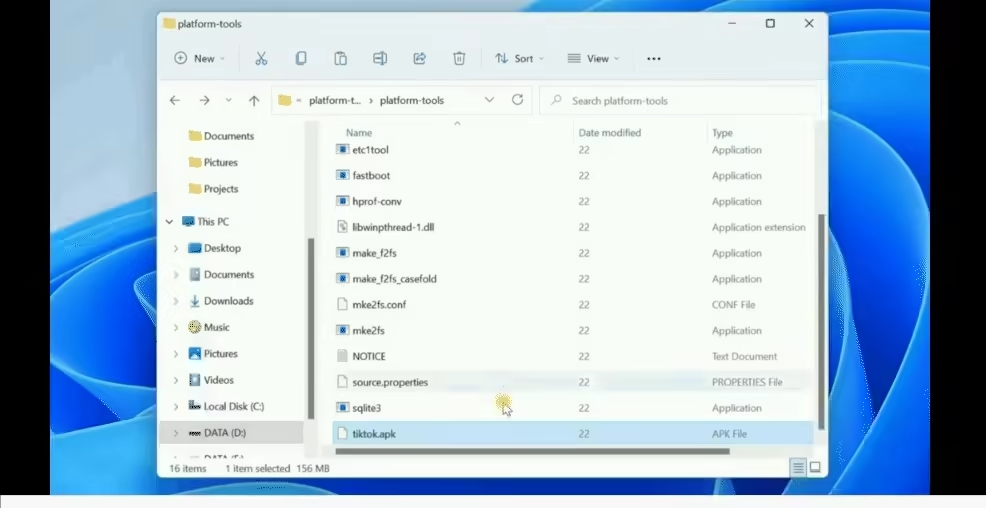
Step 3: Now you need to copy the APK file to the extracted folder which is the platform-tools folder where you will see other files as well. Below is a small video showing the location where you need to copy the downloaded APK file.
Step 4: Still in the platform tool folder, click on the address of the folder and type CMD. Press Enter. Command Prompt will open. Refer to the below image if you don’t understand what I mean.
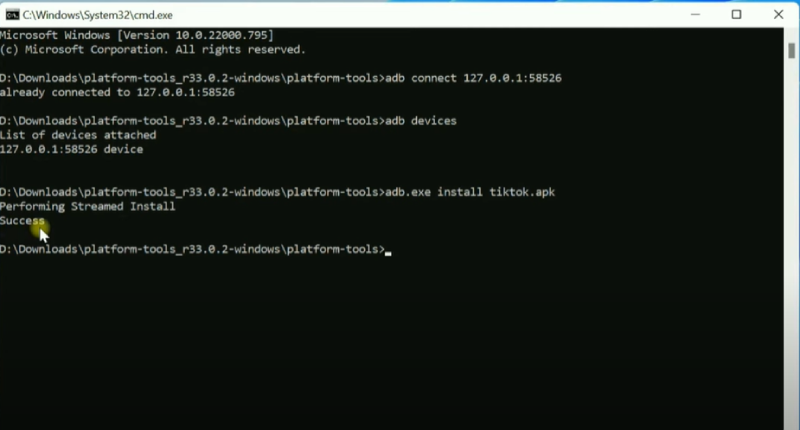
Step 5: In the command prompt, type: “adb connect 127.0.0.1:58256” and press enter. It will show that ADB is already connected.
Step 6: Now in the next line type: “adb devices”. You should see a device with an address beside it.
Step 7: Now we can install the APK by typing: “adb.exe install XYZ.apk”. Please replace XYZ with the APK filename that you copied in the platform-tools folder of Step 3. Installation of APK will start. You will get a msg of success when done.
Here is the screenshot of step 5, step 6 & step 7:
How to install android apps on PC without any software if 3 checks fail?
The answer to this question is very simple, just follow the below steps! If your windows failed the 3 checks that I mentioned above at the start of this tutorial then don’t worry, you can still install android apps on your PC without any software. However, the method will be different.
Method 1: Install and Run Android Apps via Microsoft Phone Link App
Microsoft Phone Link app acts as a gateway between your phone and windows. It lets you mirror your android phone to your Windows PC. You can access your photos & videos, notifications, send messages, and apps installed on your android phone.
The drawback of this method is that many features will not work smoothly as they work on android for some android devices. This method will best work with Samsung phones. While for this method some require Windows 10 PC running the October 2018 update or later with a minimum of 8GB of RAM. If you are planning to play games via this method then there will be some lags and delays which might not give a good user experience.
Before proceeding with the tutorial make sure that your device is listed to find out if you can effortlessly use this method or not: Supported Devices.
Let me tell you how to get this method working, just follow the steps:
Before following the steps make sure that your PC and your Android device are connected to the same WIFI network.
Step 1: On your Android Device, Open Google PlayStore and search for Link to Windows, here is the link to PlayStore: Link to Windows. Download and install the app on your android device.
Step 2: On your Windows, click on start and start typing Microsoft Store. Press Enter. Microsoft store will open. Now search for Phone Link App or simply click on the given link which will take you to the Microsoft Store page where you can download the app straightaway: Phone Link Download. Download and install the Phone link app on your PC.
Step 3: Open the Phone Link app once it is installed on your PC. Press Get Started. It will ask you to sign in which you can do. In the next step, it will ask you to Pair devices.
Step 4: Once you get the PIN you need to open the Link to Windows app on your android device and Enable Link to Windows and click on Add to Computer, you will also need to login in with the same Microsoft account that you login into Windows as mentioned in Step 2 on Link to Windows app. Finally, add the PIN from your windows PC. The pairing will start.
Step 5: When both your PC and android devices are successfully connected you can goto your windows PC and control your android device from there.
Method 2: Install and Run Android Apps via Android-X86
Android-X86 is an open-source project platform to run android apps on your PC. It is actually an entire android OS that will run on your PC instead of phones. You can download and install any app you want just like you do on android devices.
Note: This process will overwrite your existing Windows OS with Android OS so don’t use this method unless you want to format and replace your entire window with android OS.
Step 1: Download the Android-X86 OS ISO file by visiting the link: Android-X86 Download. Once you click on the download button it will take you to the mirror site from where you can download the Android-X86 ISO file.
Step 2: Now you need to make a bootable Pendrive of Android-X86 OS so that you can install it directly. For this, you need to download a small software called Rufus. Goto Rufus Website and download it from there. Once the download is complete you need to install Rufus on your PC.
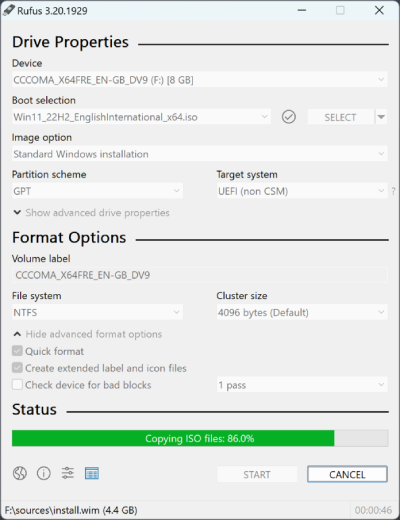
Step 3: Once you have downloaded Android-X86 OS and installed Rufus you need to make a bootable flash drive. For that you need a Pendrive and make sure that there are no important files on the Pendrive as any data on the Pendrive will get erased. Connect the Pendrive to your PC. Now Open Rufus that you installed in step 2. Under Device, you will see the name of the Pendrive that you connected. Under Boot selection, you need to browse and select the Android-X86 ISO file that you downloaded in step 1. Keeping the other options as it is click on Start. Follow the prompts, if additional files need to be downloaded, click “yes”. Wait for it to finish mounting the image on your flash drive.
Step 4: You need to enter the BIOS/UEFI settings of your windows. For this, you need to know your PC BIOS hotkey as every PC brand has its own BIOS hotkey. Here are some keys you can try F1, F10, F12, F2, DEL, ESC. You need to keep on pressing this BIOS Hotkey while your computer boots up.
If you are not able to find your PC BIOS hotkey then follow the steps to enter BIOS settings.
Click on Start and start typing settings. Press Enter, setting window will open. Go to Update & Security and select Recovery. Click on Restart now. You will be taken to a special menu for restarting that has options to “use a device”, “continue”, “turn off your PC”, or “Troubleshoot”. Select “Troubleshoot”. After this select “Advanced Option” and then select “UEFI Firmware Settings”. This will take you to BIOS settings.
Step 5: Once you are in the Bios Setting Menu. It will display the list of booting devices. You need to select USB Drive as a boot device and press Enter. Your PC will boot.
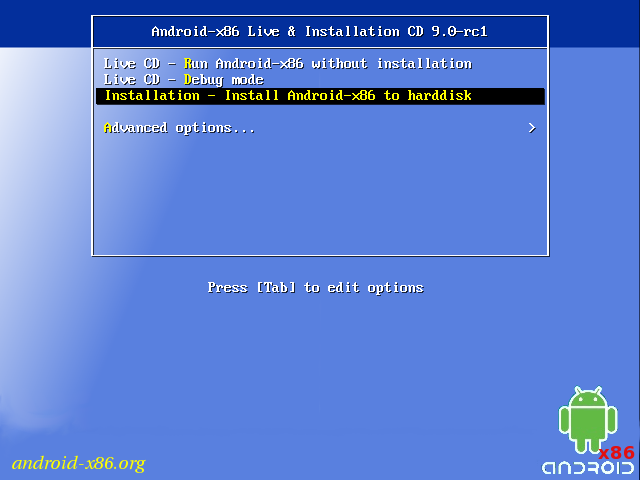
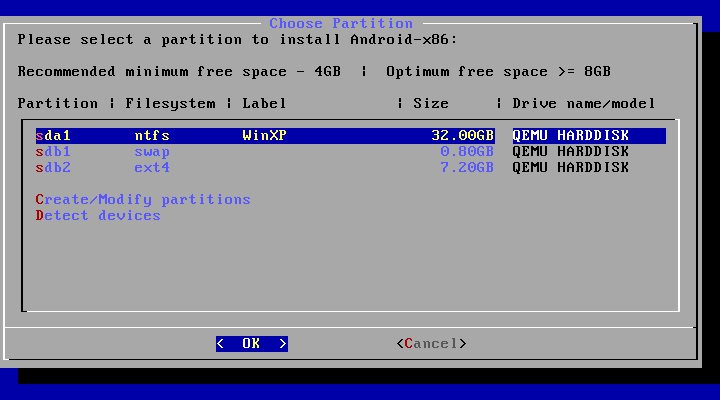
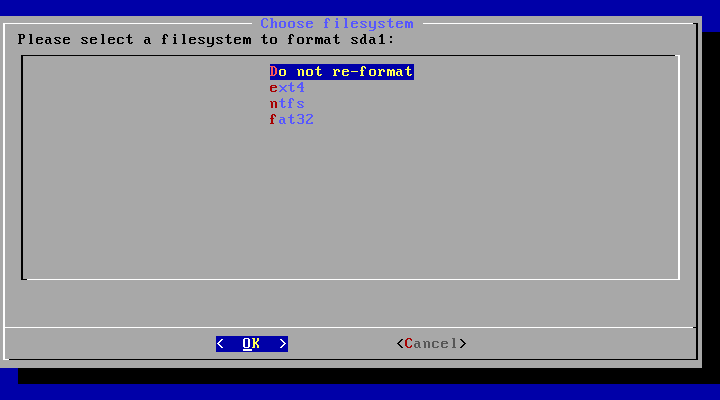
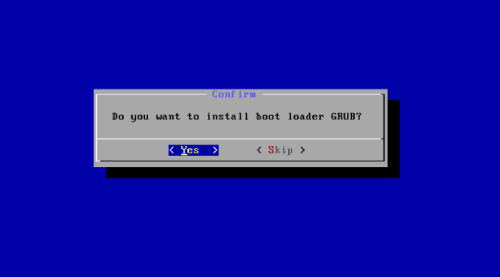
Step 6: Your PC will now show an Android-X86 home screen. Navigate to Installation and press Enter. After booting again you will see a partition screen. You can choose an existing partition or create a new partition to install Android-X86. If asked to install a boot loader GRUB, press Yes. If you happen to get any errors here is a well-documented Android-X86 Installation Document that might help.
Follow the below images if you want any help and don’t understand anything in step 6 above:
I hope the above methods will be helpful for you to know how to install android apps on your PC without any software. You can always use an emulator like Bluestack and Nox Player to run android apps and games. If you happen to come up with any other method do let me know in the comment section below.
Frequently Asked Questions
How can I install APK file in PC without any software?
There are many ways to install APK file in PC without software. One of them is by WSA. However, WSA method is limited to windows 11 only for now. The other method is using Android-X86 OS.
Can I install an Android app on my PC?
Android Apps can be installed on PC via WSA in Windows 11. The other method is using android emulators such as Bluestacks and Nox Player. Microsoft Phone Link app is another way to do so.
How can I run Android apps on my PC without BlueStacks?
Here is the list of ways to run android apps on PC without Bluestacks:
- Google Chrome extension called Android online emulator. The other one is ARC Welder.
- Screen Mirroring apps like Airdroid, AirMore.
- Android SDK Platform-tools.
- Android-X86 OS
- Nox Player which is an alternative to Bluestack.
Can I install Android on PC without Emulator?
The most convenient way to run android apps on PC without emulator is via chrome extensions and Android-X86 OS. Follow the steps mentioned in this tutorial.
How can I make my PC Android?
The simplest way is to download Android-X86. Android-X86. Android-X86 is an open-source project platform to run android apps on your PC. It is actually an entire android OS that will run on your PC instead of phones. You can download and install any app you want just like you do on android devices.
Will Windows 11 run Android apps?
Microsoft has finally come up with a way to run android apps. Windows subsystem for android is a convenient way to install android apps on windows machines. You can use the WSA PacMan tool to install APKs once WSA is installed.
How do I run an APK file without an emulator?
APK files are android app file extensions. You can run APK files on Windows as well with an emulator. If you want to run an APK file without an emulator here are some ways:
- Google Chrome extensions like Android online emulator or ARC Welder.
- Screen Mirroring apps like Airdroid or AirMore.
- Android SDK Platform-tools.
- Android-X86 OS.
- Nox Player which is an alternative to the BlueStack emulator.