Table of Contents
Gravity Forms is one of the most feature rich form builder plugin for WordPress. Its capabilities goes beyond simple contact forms to advanced forms which can be used to sell products, automatically save guest posts for preview and so much more. In this article, we will get acquainted with some of the advanced features of this WordPress plugin and let you know how to use Gravity Forms WordPress plugin like a pro.
![]()
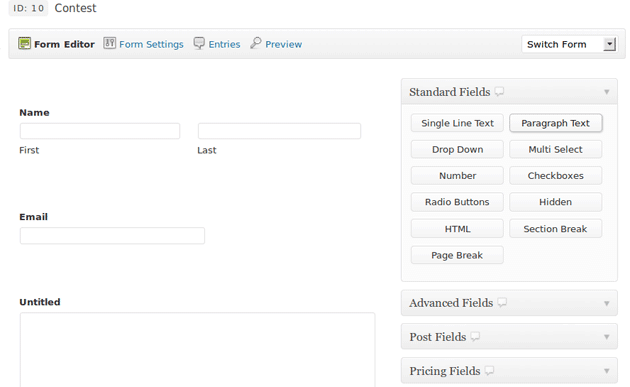
Gravity forms has an intuitive design and it is very easy to configure and use. It comes with a range of fields which are arranged in categories for quick and easy access. All the fields are arranged under four segments called Standard, Advanced, Post and Pricing fields.
Here is a brief introduction for each category of fields
Standard – This category encompasses all the basic fields which are used for a creation of simple contact forms. It has input boxes, text areas, dropdowns, checkboxes, radio buttons, HTML, page breaks etc. If you are in need of a simple form then this category alone is enough.

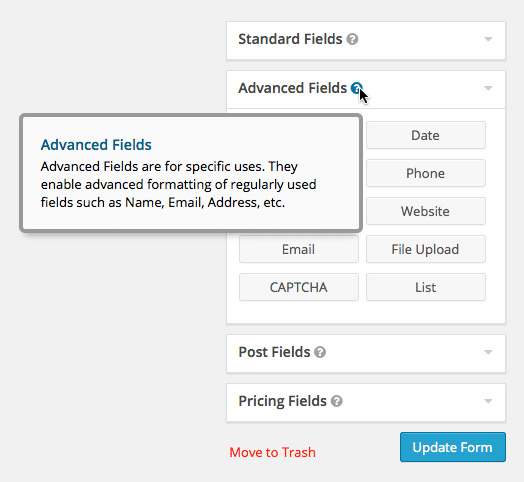
Advanced Fields – Advanced fields are a combination of standard fields or have some validations attached to them. Like name field is a combination of two input boxes. When you add name field in your form it will automatically add two fields with sub-labels First Name and Last Name. You can also add middle name if you want by changing the settings of Name field. Email is an advanced field which has in-built validations to check whether the entered text is in a proper format to be considered as an email. This field will generate an error on submission if the data entered is not in correct format. You also get a date, phone etc fields under this category.
Post Fields – This category is specifically targeted for those webmaster who want to have guest posts on their blog. Usually, it is quite difficult to manage guest post via email and too risky to give guest account access to authors for submission of posts. Forms created using posts fields helps you mitigate these issues. You can use post fields like title, tags, excerpt, body, custom fields to create a form and all the data submitted using this form will be saved as a post for review. So, you get a post saved for review in WordPress dashboard without giving access of backend to guest authors.

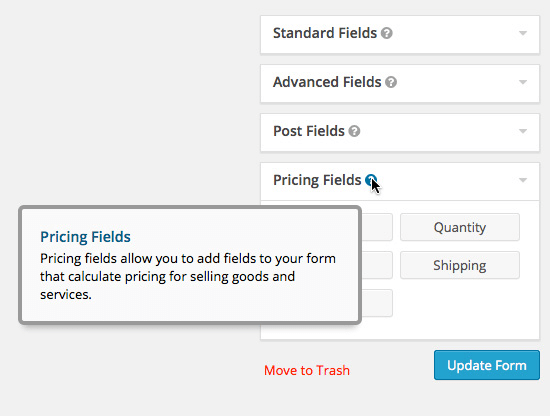
Pricing – These fields are useful if you want to sell something using a form. You get access to quantity, price, shipping, total etc fields and it can be integrated with paypal as well as stripe payment gateways.
Form Creator and Form Designer
How to use Gravity Forms WordPress plugin is the one of the most frequently asked questions after buying Gravity forms. But Gravity forms is simple to use as Gravity Forms comes with drag and drop form builder. Fields can be added by dragging and dropping them in form wrapper section. It is also easy to change the order of fields by dragging them to desired position. Once you have added all the required fields then all you have to do is to save it by clicking on the Update Form button.

It is possible to design the form to your needs.Gavity forms isn’t easy to use? However there is no inbuilt form designer and you have to rely on CSS classes and properties to change its appearance. CSS classes for Gravity Forms are very well documented and you can check them out here. However if you are not into coding then the documentation can be overwhelming and a little difficult to implement. I have been using Gravity Forms CSS plugin from WordPress repository and since then I never needed to use CSS classes. If you ever find a feature missing in Gravity Forms then you must search for a plugin in WordPress repository and it is highly probable that you will get what you are looking for.
Conditional Logic : Conditional logic is one of the most appreciated features of this form builder plugin. You can set conditions in a field to show/hide itself depending upon what data is filled/selected by users in previous fields. You can also hide pages in multi-page forms using conditional logic.
Import and Export: Since Gravity Forms store all the form data inside WordPress database so, it is pretty easy to migrate data from one WordPress installation to another. You can take advantage of inbuilt export/import feature to export all forms or a specific form and even specific fields of forms. If you backup all of the database and migrate your hosting then all your Gravity form data like forms, entries and settings will also get migrated.
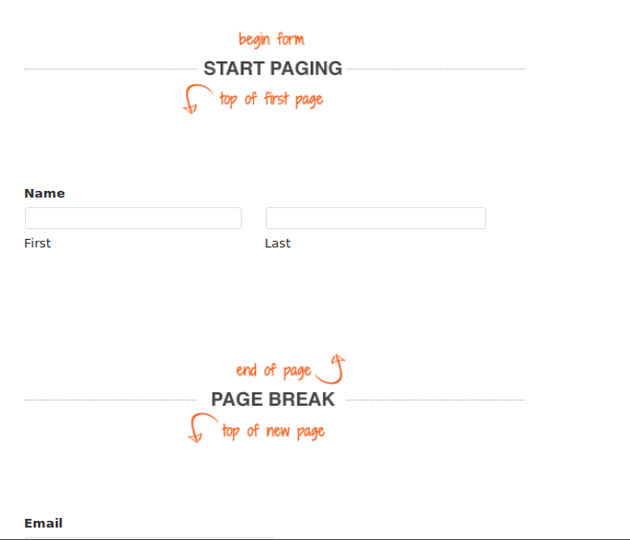
Multi-Step Forms : It is well known that users are more comfortable in filling small forms because they get overwhelmed when presented with too many form fields on a single page. So, if you need to collect a lot of information then it is better to divide the form into multiple steps/pages. Gravity Forms has this feature inbuilt in its form creator. You can divide the form by adding the page break field located under Standard Fields category.
Sidebar Widget : Gravity form widget can be used to add forms in sidebars and footer section of website. Navigate to widgets section in WordPress dashboard and then drop the forms widget into sidebar. This will insert your selected form into sidebar.
Limit Submissions: You can limit the submissions to a particular

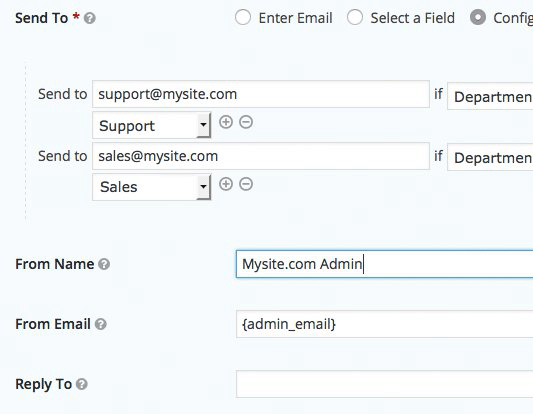
Advanced Notifications : It is possible to get Email notification whenever a form is submitted. You can also select different emails depending upon what data is filled by the user. Rules can be set to send notifications to particular recipients if a specific option is selected in the form.
Anti-spam Protection : To protect forms from spammers one can use ReCaptcha or Anti-spam honeypot mechanism in the form.
How to use Gravity Forms WordPress plugin in Posts
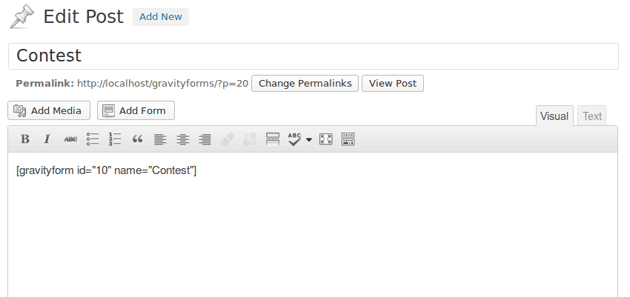
After getting to know how to use Gravity Forms WordPress plugin its time to know how you can insert them in your posts. Once you have created a form then create a new page/post. You will see Add Form option next to Add media option in your post editor.
Clicking on Add Form button will open a popup window from which you can select form. You will also get the option to enable Ajax. It is a technology that submits the forms without page refresh.
Conclusion:
Gravity forms is a premium plugin and it justifies its price with all the advanced features which come’s inbuilt in it. However, it is an overkill if you don’t need conditional logic or advanced fields. If you don’t need an all-around form solution then you will be better with Contact Form 7 or other such free solutions. If you are searching for a commenting plugin for WordPress then here is a small list of best WordPress commenting plugins that may be useful!
If you have your own creative way of using Gravity Forms then do share it below by commenting. Also if How to use Gravity Forms WordPress plugin was useful then don’t forget to share it with your friends!


