In this tutorial, I will tell you how to download Autosync for PC. Autosync offers automatic file sync and backup tool and is an app on Google Playstore and iOS store. However, I will tell you how to download Autosync for PC in this article.
Autosync App is an active curated app made to help you auto-sync your files and data between Android and many cloud storage solutions. Autosync provides a very simple and seamless way to sync your files, documents, or images across those platforms that works in the background when you want to keep those files updated on both ends. Synching comes with an intuitive interface where users can easily set the sync tasks, and the data can be kept up to date without the need for any manual intervention.
Most notably, the Autosync App supports a wide range of cloud services, including Google Drive, Dropbox, OneDrive, and Box. Users can set up automatic synchronization to these cloud platforms from their devices and ensure that any new or modified files are uploaded without delay. It also has two-way sync, so if your file has been adjusted on the cloud or on your device, it will replicate everywhere, thus preventing the situation of data inconsistency and offering good file handling across devices and platforms.
Autosync also provides customizable sync options based on varying user needs. Selected Folders Sync: Users have the option to change specific folders to be synced between platforms. Sync Intervals: Users can set the sync intervals (manual, scheduled, continuous) and rules for managing conflicts. This app is intended to run silently in background mode so that syncing tasks can happen in the background without interrupting the normal function of the device. In addition to this, it has Wi-Fi-only syncing to save your mobile data and the ability to choose files or folders you do not wish to sync for advanced management.
Features of Autosync App:
- Automatic Real-Time Sync: Continuously syncs files between your device and cloud storage services in real-time or on scheduled intervals.
- Supports Multiple Cloud Services: Compatible with popular cloud providers like Google Drive, Dropbox, OneDrive, Box, and more.
- Two-Way Synchronization: Ensures changes made on the device or cloud are reflected everywhere, maintaining data consistency.
- Selective Folder Sync: Allows users to choose specific folders or files for synchronization, giving fine-grained control.
- Wi-Fi-Only Sync: Option to sync only over Wi-Fi to save mobile data.
- Conflict Resolution: Handles conflicts automatically or prompts users for decisions when files are modified simultaneously.
- Background Operation: Runs silently in the background, ensuring ongoing sync without interrupting device use.
- Encryption & Security: Supports encrypted data transfer to protect sensitive information.
- Log & Notification System: Provides detailed logs and notifications about sync activities and errors.
- Flexible Scheduling: Offers options for manual, scheduled, or continuous sync modes.
Due to the popularity of Android and iOS devices, many apps are made only for these platforms and very few for Windows and PCs. Even if Autosync may not be available for PC or Windows but only on the Google Play Store or iOS App Store, there are still some tricks and tips that can help you download Autosync for PC. You can take the help of Android emulators to install and download Autosync for PC. This article will help you navigate how to download Autosync for PC.
Download & Install Autosync on PC:
If you want to run Android apps on your PC without any software, then you can read this tutorial: How to Install Android Apps on PC without any Software? Alternatively, you can run Android apps like Autosync via Android Emulators like BlueStacks, LDPlayer and NoxPlayer.
Or, you can download APK files on your PC, you need to find a reliable source for the APK and then download it safely. Just follow the various methods and steps listed in this article to Download Autosync for PC and Autosync will run on your PC without any problem.
Please note that we are strongly against downloading or installing applications from third-party sources. Such apps may pose security risks, compromise your personal data, or violate app store policies. For your safety and to ensure optimal performance, please use official app stores such as the Google Play Store or the Apple App Store for all downloads.
Method – 1: Download and Install Autosync using Bluestacks
As I told you before, the Autosync app is not available for PC but you can still download Autosync for PC using a Bluestacks emulator. BlueStacks is an Android emulator that lets you run Android apps on a computer. Just follow the steps below to properly download and install Autosync on your PC:
Step 1: Download and Install BlueStacks:
First, you have to download BlueStacks on your PC. You can visit the official website of Bluestacks and download it from there or download it from the link below.
Run the installer and follow the on-screen instructions to complete the installation.
Step 2: Set Up BlueStacks:
Launch BlueStacks after installation.
Once the Bluestacks emulator is launched, open the Google Play Store within BlueStacks. Sign in with your Google account to access the Google Play Store. You can use a Gmail account to do so but if you don’t have a Gmail account, then you need to create one.
Step 3: Install Autosync App:
- Via Google Play Store:
- Open the Google Play Store app within BlueStacks.
- Search for the Autosync app.
- Click “Install” to download and install the Autosync app.
- Look for Autosync icon created on the Bluestacks emulator homepage.
- Via APK Files:
- You need to find a reliable source for the Autosync APK and then download it safely:
- Drag and drop the downloaded Autosync APK file directly onto the BlueStacks window.
- Alternatively, use the “Install APK” feature:
- Click on the “Install APK” button (usually a toolbar icon) or press Ctrl + Shift + B.
- Locate the downloaded Autosync APK file on your PC and select it.
- BlueStacks will install the app automatically.
- Your Autosync should appear on the BlueStacks home screen.
- You need to find a reliable source for the Autosync APK and then download it safely:

Method – 2: Download and Install Autosync using LDPlayer
If you don’t want to install the Bluestacks Android emulator but still want to enjoy and download Autosync for PC, then here is another emulator you can download. LDPlayer is another Android emulator that you can use. Just follow the steps below to install the Autosync:
Step 1: Download and Install LDPlayer:
First, you have to download LDPlayer on your PC. You can visit the official website of LDPlayer and download it from there or download it from the link below.
Run the installer and follow the on-screen instructions to complete the installation.
Step 2: Set Up LDPlayer:
Launch LDPlayer after installation.
Once the LDPlayer emulator is launched, open the Google Play Store within LDPlayer. Sign in with your Google account to access the Google Play Store. You can use a Gmail account to do so but if you don’t have a Gmail account, then you need to create one.
Step 3: Install Autosync App:
- Via Google Play Store:
- Open the Google Play Store app within LDPlayer.
- Search for the Autosync app.
- Click “Install” to download and install the Autosync app.
- Look for Autosync icon created on the LDPlayer emulator homepage.
- Via APK Files:
- You need to find a reliable source for the Autosync APK and then download it safely:
- Drag and drop the downloaded Autosync APK file directly onto the LDPlayer window.
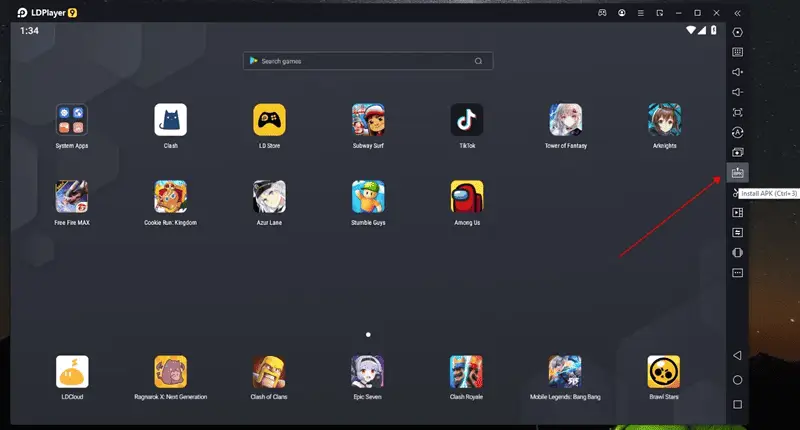
- Alternatively, use the “Install APK” feature:
- Click on the “Install APK” button (usually a toolbar icon) or press Ctrl + 3.
- Locate the downloaded Autosync APK file on your PC and select it.
- LDPlayer will install the app automatically.
- Your Autosync should appear on the LDPlayer home screen.
- You need to find a reliable source for the Autosync APK and then download it safely:
Method – 3: Download and Install Autosync using NoxPlayer
There is another emulator that you can use to run Autosync on Windows. NoxPlayer will help you to do so.
Step 1: Download and Install NoxPlayer:
First, you have to download NoxPlayer on your PC. You can visit the official website of NoxPlayer and download it from there or download it from the link below.
Run the installer and follow the on-screen instructions to complete the installation.
Step 2: Set Up NoxPlayer:
Launch NoxPlayer after installation.
Once the NoxPlayer emulator is launched, open the Google Play Store within NoxPlayer. Sign in with your Google account to access the Google Play Store. You can use a Gmail account to do so but if you don’t have a Gmail account, then you need to create one.
Step 3: Install Autosync App:
- Via Google Play Store:
- Open the Google Play Store app within NoxPlayer.
- Search for the Autosync app.
- Click “Install” to download and install the Autosync app.
- Look for Autosync icon created on the NoxPlayer emulator homepage.
- Via APK Files:
- You need to find a reliable source for the Autosync APK and then download it safely:
- Drag and drop the downloaded Autosync APK file directly onto the NoxPlayer window.
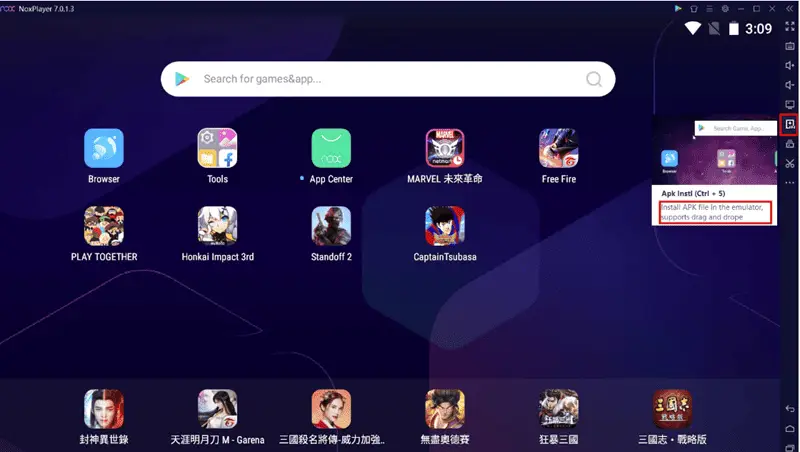
- Alternatively, use the “Install APK” feature:
- Click on the “Install APK” button (usually a toolbar icon) or press Ctrl + 5.
- Locate the downloaded Autosync APK file on your PC and select it.
- NoxPlayer will install the app automatically.
- Your Autosync should appear on the NoxPlayer home screen.
- You need to find a reliable source for the Autosync APK and then download it safely:
Autosync App not available on Google Play Store?
You must have noticed that in all the above-mentioned methods, we are downloading Autosync from the Play Store. However, sometimes it can happen that due to geolocation restrictions, Autosync might not be available in your region. So, what to do in that kind of situation? Well, here is another trick for you to run and install Autosync on PC without geo-restriction or Google Play Store.
Pre-requisite
Before moving forward, you need to download the Autosync APK file from a reliable, credible and trustworthy third-party website to run it on your PC if it is unavailable on the Google Play Store.
We strongly recommend against downloading or installing applications from third-party sources. Such apps may pose security risks, compromise your personal data, or violate app store policies. For your safety and to ensure optimal performance, please use official app stores such as the Google Play Store or the Apple App Store for all downloads.
Procedure
Follow the steps to run the downloaded Autosync APK file on PC, We are using BlueStacks for this tutorial:
Step 1: Download and install Bluestacks or Nox Player or LDPlayer, steps and links are mentioned in Method 1, Method 2 and Method 3.
Step 2: Launch Bluestacks on your computer. Now, head over to the “Install APK” button which is on the right sidebar as shown in the image below.
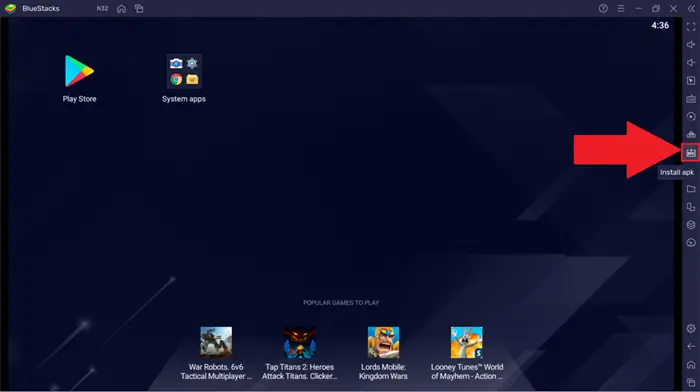
Step 3: A Windows Explorer pop-up will come up. Navigate to the downloaded Autosync APK file location. Now select the Autosync APK and click on open. The app installation will begin and once the installation is complete, the app will appear on the BlueStacks home screen.
OR
Step 3: You can simply navigate to the Autosync APK file location and drag the downloaded Autosync APK to BlueStacks. The installation will begin, and once completed, the app will appear on the BlueStacks home screen.
Alternative Apps to Autosync App:
- FolderSync: A popular app that allows sync of files and folders between Android device and cloud storage services.
- Sync.com: Cloud storage with built-in sync features, emphasizing security and privacy.
- Resilio Sync: Uses peer-to-peer technology to sync files directly between devices without relying on cloud servers.
- Google Files: While primarily a file management tool, it offers some sync and backup capabilities.
- Dropsync: Specifically designed for Dropbox, enabling continuous sync between device folders and Dropbox cloud.
- OneSync: Supports synchronization between local device folders and cloud services with flexible options.