In this tutorial, I will tell you how to download TunnelBear VPN for PC. TunnelBear VPN offers simple and secure online privacy for everyone and is available on the Google Play Store and the iOS App Store. However, I will tell you how to download TunnelBear VPN for PC in this article.
TunnelBear VPN brings a wide array of features to the table in a crowded cybersecurity landscape, standing out with its dedication to simplicity, privacy, and a cute bear-themed aesthetic. TunnelBear is built for those everyday/average/regular/basic computer users who want to use a VPN but lack the knowledge to do so securely and safely. With its user-friendly, pleasant, and unobtrusive design, it makes staying safe online easy and non-threatening. With its cutesy branding — featuring lovable bear cartoons — and a fun narrative that the much-talked-about VPN (private virtual network) is meant for evolution, it cleverly disguises its ardent approach to digital privacy, which helps even a newbie breeze through the nuances of VPN.
At the heart of TunnelBear VPN protection, you will find AES-256 encryption, the industry standard to keep your data out of the hands of snoopers and cybercriminals from halfway around. Apart from encryption, it also follows a strict no-logging policy, meaning it never monitors and records your online activities. It adds to this layer of security with features like Vigilant Bear, a kill switch that prevents data leakage should the VPN go down, and Ghost Bear, which is meant to bypass internet blocking and censorship by disguising VPN traffic. This makes you and your digital life effectively untouchable.
It operates with a global footprint with its servers in many countries, giving users access to content worldwide to defeat geo-restriction. TunnelBear VPN works on several devices, but can cover your laptop, phone, and tablet under one subscription. The platform offers easy-to-use applications on multiple platforms, providing a seamless experience across devices.
Features of the TunnelBear VPN:
- Benefit from robust AES-256 encryption to secure your internet connection.
- Rest assured with a strict no-logging policy, ensuring your online activities are never recorded.
- Bypass censorship and geo-restrictions with GhostBear mode, making your VPN traffic less detectable.
- Utilize the VigilantBear kill switch to block all internet traffic if your VPN connection unexpectedly drops.
- Connect up to five devices simultaneously under one account, protecting your entire household.
- Enjoy a super simple user interface that makes connecting to a VPN as easy as flipping a switch.
- Access a vast global server network across numerous countries for worldwide access.
- Selectively route your traffic with the SplitBear feature, deciding which apps use the VPN and which do not.
- Gain peace of mind with integrated features designed for secure browsing protection against trackers.
- Receive assistance whenever needed with dedicated 24/7 customer support.
Due to the popularity of Android and iOS devices, many apps are made only for these platforms and very few for Windows and PCs. Even if TunnelBear VPN may not be available for PC or Windows but only on the Google Play Store or iOS App Store, there are still some tricks and tips that can help you download TunnelBear VPN for PC. You can take the help of Android emulators to install and download TunnelBear VPN for PC. This article will help you navigate how to download TunnelBear VPN for PC.
Download & Install TunnelBear VPN on PC:
If you want to run Android apps on your PC without any software, then you can read this tutorial: How to Install Android Apps on PC without any Software? Alternatively, you can run Android apps like TunnelBear VPN via Android Emulators like BlueStacks, LDPlayer and NoxPlayer.
Or, you can download APK files on your PC, you need to find a reliable source for the APK and then download it safely. Just follow the various methods and steps listed in this article to Download TunnelBear VPN for PC and TunnelBear VPN will run on your PC without any problem.
Please note that we are strongly against downloading or installing applications from third-party sources. Such apps may pose security risks, compromise your personal data, or violate app store policies. For your safety and to ensure optimal performance, please use official app stores such as the Google Play Store or the Apple App Store for all downloads.
Method – 1: Download and Install TunnelBear VPN using Bluestacks
As I told you before, the TunnelBear VPN app is not available for PC but you can still download TunnelBear VPN for PC using a Bluestacks emulator. BlueStacks is an Android emulator that lets you run Android apps on a computer. Just follow the steps below to properly download and install TunnelBear VPN on your PC:
Step 1: Download and Install BlueStacks:
First, you have to download BlueStacks on your PC. You can visit the official website of Bluestacks and download it from there or download it from the link below.
Run the installer and follow the on-screen instructions to complete the installation.
Step 2: Set Up BlueStacks:
Launch BlueStacks after installation.
Once the Bluestacks emulator is launched, open the Google Play Store within BlueStacks. Sign in with your Google account to access the Google Play Store. You can use a Gmail account to do so but if you don’t have a Gmail account, then you need to create one.
Step 3: Install TunnelBear VPN App:
- Via Google Play Store:
- Open the Google Play Store app within BlueStacks.
- Search for the TunnelBear VPN app.
- Click “Install” to download and install the TunnelBear VPN app.
- Look for TunnelBear VPN icon created on the Bluestacks emulator homepage.
- Via APK Files:
- You need to find a reliable source for the TunnelBear VPN APK and then download it safely:
- Drag and drop the downloaded TunnelBear VPN APK file directly onto the BlueStacks window.
- Alternatively, use the “Install APK” feature:
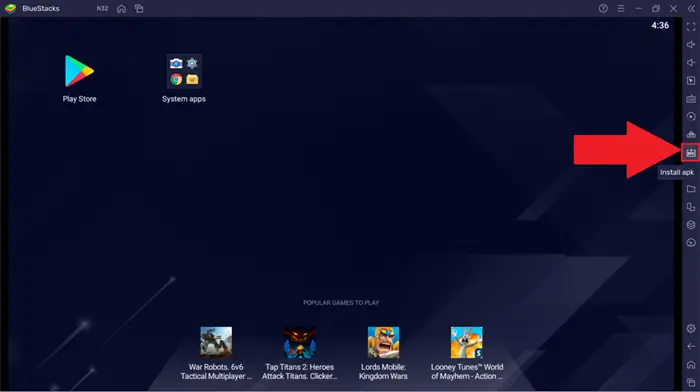
- Click on the “Install APK” button (usually a toolbar icon) or press Ctrl + Shift + B.
- Locate the downloaded TunnelBear VPN APK file on your PC and select it.
- BlueStacks will install the app automatically.
- Your TunnelBear VPN should appear on the BlueStacks home screen.
- You need to find a reliable source for the TunnelBear VPN APK and then download it safely:

Method – 2: Download and Install TunnelBear VPN using LDPlayer
If you don’t want to install the Bluestacks Android emulator but still want to enjoy and download TunnelBear VPN for PC, then here is another emulator you can download. LDPlayer is another Android emulator that you can use. Just follow the steps below to install the TunnelBear VPN:
Step 1: Download and Install LDPlayer:
First, you have to download LDPlayer on your PC. You can visit the official website of LDPlayer and download it from there or download it from the link below.
Run the installer and follow the on-screen instructions to complete the installation.
Step 2: Set Up LDPlayer:
Launch LDPlayer after installation.
Once the LDPlayer emulator is launched, open the Google Play Store within LDPlayer. Sign in with your Google account to access the Google Play Store. You can use a Gmail account to do so but if you don’t have a Gmail account, then you need to create one.
Step 3: Install TunnelBear VPN App:
- Via Google Play Store:
- Open the Google Play Store app within LDPlayer.
- Search for the TunnelBear VPN app.
- Click “Install” to download and install the TunnelBear VPN app.
- Look for TunnelBear VPN icon created on the LDPlayer emulator homepage.
- Via APK Files:
- You need to find a reliable source for the TunnelBear VPN APK and then download it safely:
- Drag and drop the downloaded TunnelBear VPN APK file directly onto the LDPlayer window.
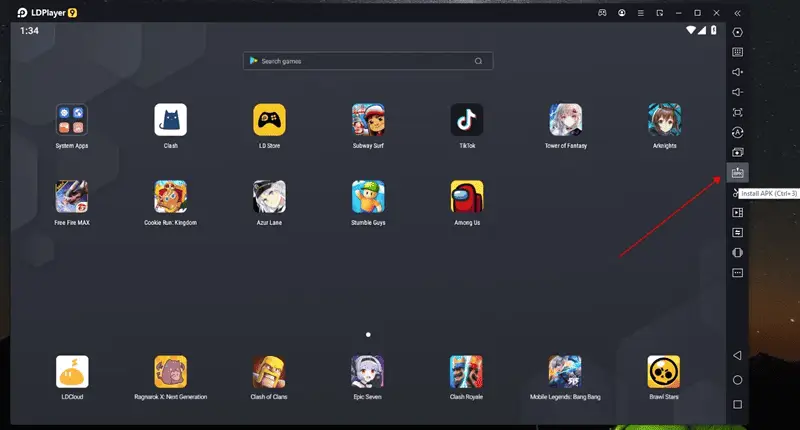
- Alternatively, use the “Install APK” feature:
- Click on the “Install APK” button (usually a toolbar icon) or press Ctrl + 3.
- Locate the downloaded TunnelBear VPN APK file on your PC and select it.
- LDPlayer will install the app automatically.
- Your TunnelBear VPN should appear on the LDPlayer home screen.
- You need to find a reliable source for the TunnelBear VPN APK and then download it safely:
Method – 3: Download and Install TunnelBear VPN using NoxPlayer
There is another emulator that you can use to run TunnelBear VPN on Windows. NoxPlayer will help you to do so.
Step 1: Download and Install NoxPlayer:
First, you have to download NoxPlayer on your PC. You can visit the official website of NoxPlayer and download it from there or download it from the link below.
Run the installer and follow the on-screen instructions to complete the installation.
Step 2: Set Up NoxPlayer:
Launch NoxPlayer after installation.
Once the NoxPlayer emulator is launched, open the Google Play Store within NoxPlayer. Sign in with your Google account to access the Google Play Store. You can use a Gmail account to do so but if you don’t have a Gmail account, then you need to create one.
Step 3: Install TunnelBear VPN App:
- Via Google Play Store:
- Open the Google Play Store app within NoxPlayer.
- Search for the TunnelBear VPN app.
- Click “Install” to download and install the TunnelBear VPN app.
- Look for TunnelBear VPN icon created on the NoxPlayer emulator homepage.
- Via APK Files:
- You need to find a reliable source for the TunnelBear VPN APK and then download it safely:
- Drag and drop the downloaded TunnelBear VPN APK file directly onto the NoxPlayer window.
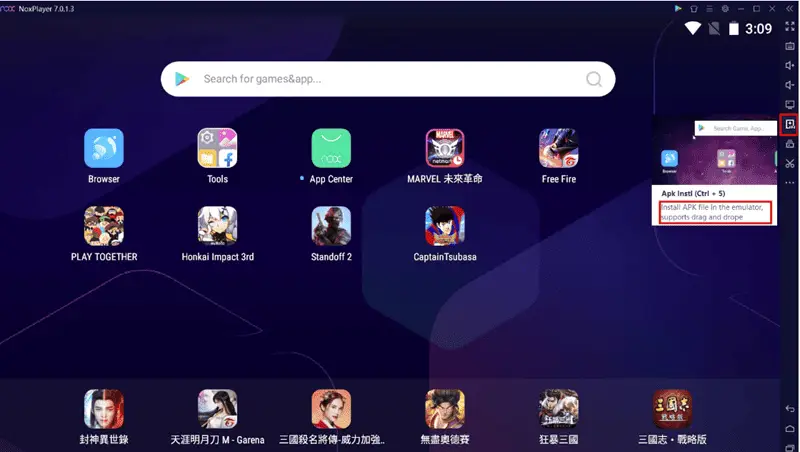
- Alternatively, use the “Install APK” feature:
- Click on the “Install APK” button (usually a toolbar icon) or press Ctrl + 5.
- Locate the downloaded TunnelBear VPN APK file on your PC and select it.
- NoxPlayer will install the app automatically.
- Your TunnelBear VPN should appear on the NoxPlayer home screen.
- You need to find a reliable source for the TunnelBear VPN APK and then download it safely:
TunnelBear VPN App not available on Google Play Store?
You must have noticed that in all the above-mentioned methods, we are downloading TunnelBear VPN from the Play Store. However, sometimes it can happen that due to geolocation restrictions, TunnelBear VPN might not be available in your region. So, what to do in that kind of situation? Well, here is another trick for you to run and install TunnelBear VPN on PC without geo-restriction or Google Play Store.
Pre-requisite
Before moving forward, you need to download the TunnelBear VPN APK file from a reliable, credible and trustworthy third-party website to run it on your PC if it is unavailable on the Google Play Store.
We strongly recommend against downloading or installing applications from third-party sources. Such apps may pose security risks, compromise your personal data, or violate app store policies. For your safety and to ensure optimal performance, please use official app stores such as the Google Play Store or the Apple App Store for all downloads.
Procedure
Follow the steps to run the downloaded TunnelBear VPN APK file on PC, We are using BlueStacks for this tutorial:
Step 1: Download and install Bluestacks or Nox Player or LDPlayer, steps and links are mentioned in Method 1, Method 2 and Method 3.
Step 2: Launch Bluestacks on your computer. Now, head over to the “Install APK” button which is on the right sidebar as shown in the image below.
Step 3: A Windows Explorer pop-up will come up. Navigate to the downloaded TunnelBear VPN APK file location. Now select the TunnelBear VPN APK and click on open. The app installation will begin and once the installation is complete, the app will appear on the BlueStacks home screen.
OR
Step 3: You can simply navigate to the TunnelBear VPN APK file location and drag the downloaded TunnelBear VPN APK to BlueStacks. The installation will begin, and once completed, the app will appear on the BlueStacks home screen.
Alternatives to the TunnelBear VPN:
- NordGuardian: Your digital fortress for ultimate online privacy and security.
- ExpressShield: Blazing fast speeds and rock-solid encryption for seamless streaming and browsing.
- CyberGhost Pro: Unblock the internet with ease, anonymity, and a user-friendly experience.
- SurfSafe: Browse the web with confidence and impenetrable protection against tracking.
- PrivateInternetAccess Fort: Comprehensive security solutions for every device you own, with extensive customization.
- ProtonVPN Secure: Built by scientists, trusted by activists, designed for privacy and online freedom.
- AtlasNet: Navigate the digital world with a truly global and secure connection anywhere.
- KeeperConnect: Simple, intuitive protection that keeps your online activity private and secure.