In this tutorial, I will tell you how to download Microsoft Lens for PC. Microsoft Lens is a multifunctional Android app created to capture, refine, and convert images of documents, whiteboards, receipts and is available on the Google Play Store and the iOS App Store. However, I will tell you how to download Microsoft Lens for PC in this article.
Microsoft Lens is an application that scans documents and other physical items and converts them into digital copies that are readable, shareable, and easy to store and edit. Its simple user interface makes it appropriate for individual and business use, enabling users to convert paper data into digital data within seconds and without a cumbersome scanner or any additional hardware.
Microsoft Lens has a very cool feature where it is able to crop the image and also able to enhance the image of a document. Similar to other Whiteboard scanner apps, this app detects the boundaries of the documents or whiteboards automatically and cuts the unwanted background, reducing clutter. Additionally, it enables some image correction techniques such as removing glare and smoothing the background, making sure that the scanned images are clear and aesthetically pleasing. Be it handwritten notes or printed material, Microsoft Lens gives you clear and legible results.
With Microsoft 365, Microsoft Lens fits well within the entire scope of services that deliver productivity and collaboration. Users can save scanned files directly to OneDrive or OneNote so that they can be accessed easily on mobile devices and shared with colleagues or classmates. The app also enables you to convert images into editable formats like Word or PowerPoint, providing a method to quickly change scans into editable documents. This feature is especially useful for OCR (Optical Character Recognition) extractions, as it enables easy re-use and editing of text from physical sources.
Features of Microsoft Lens:
- Document Scanning: Capture photos of documents, receipts, business cards, and whiteboards with automatic edge detection and cropping.
- Image Enhancement: Improve scanned images by removing glare, adjusting brightness, and correcting perspective distortions for clear, professional-quality scans.
- OCR (Optical Character Recognition): Convert images into editable and searchable text, making it easy to extract information from scanned documents.
- Multiple Save Options: Save scans as PDF, Word, PowerPoint, or image files, and store them directly to OneDrive, OneNote, or locally on the device.
- Whiteboard Mode: Capture and enhance whiteboard content during meetings or brainstorming sessions, preserving handwritten notes and diagrams.
- Seamless Integration: Easily sync with Microsoft 365 services for effortless sharing, editing, and collaboration.
- Batch Scanning: Quickly scan multiple pages into a single document, ideal for digitizing lengthy documents or multi-page receipts.
- Customizable Settings: Adjust scan quality, file format, and storage options to suit user preferences.
Due to the popularity of Android and iOS devices, many apps are made only for these platforms and very few for Windows and PCs. Even if Microsoft Lens may not be available for PC or Windows but only on the Google Play Store or iOS App Store, there are still some tricks and tips that can help you download Microsoft Lens for PC. You can take the help of Android emulators to install and download Microsoft Lens for PC. This article will help you navigate how to download Microsoft Lens for PC.
Download & Install Microsoft Lens on PC:
If you want to run Android apps on your PC without any software, then you can read this tutorial: How to Install Android Apps on PC without any Software? Alternatively, you can run Android apps like Microsoft Lens via Android Emulators like BlueStacks, LDPlayer and NoxPlayer.
Or, you can download APK files on your PC, you need to find a reliable source for the APK and then download it safely. Just follow the various methods and steps listed in this article to Download Microsoft Lens for PC and Microsoft Lens will run on your PC without any problem.
Please note that we are strongly against downloading or installing applications from third-party sources. Such apps may pose security risks, compromise your personal data, or violate app store policies. For your safety and to ensure optimal performance, please use official app stores such as the Google Play Store or the Apple App Store for all downloads.
Method – 1: Download and Install Microsoft Lens using Bluestacks
As I told you before, the Microsoft Lens app is not available for PC but you can still download Microsoft Lens for PC using a Bluestacks emulator. BlueStacks is an Android emulator that lets you run Android apps on a computer. Just follow the steps below to properly download and install Microsoft Lens on your PC:
Step 1: Download and Install BlueStacks:
First, you have to download BlueStacks on your PC. You can visit the official website of Bluestacks and download it from there or download it from the link below.
Run the installer and follow the on-screen instructions to complete the installation.
Step 2: Set Up BlueStacks:
Launch BlueStacks after installation.
Once the Bluestacks emulator is launched, open the Google Play Store within BlueStacks. Sign in with your Google account to access the Google Play Store. You can use a Gmail account to do so but if you don’t have a Gmail account, then you need to create one.
Step 3: Install Microsoft Lens App:
- Via Google Play Store:
- Open the Google Play Store app within BlueStacks.
- Search for the Microsoft Lens app.
- Click “Install” to download and install the Microsoft Lens app.
- Look for Microsoft Lens icon created on the Bluestacks emulator homepage.
- Via APK Files:
- You need to find a reliable source for the Microsoft Lens APK and then download it safely:
- Drag and drop the downloaded Microsoft Lens APK file directly onto the BlueStacks window.
- Alternatively, use the “Install APK” feature:
- Click on the “Install APK” button (usually a toolbar icon) or press Ctrl + Shift + B.
- Locate the downloaded Microsoft Lens APK file on your PC and select it.
- BlueStacks will install the app automatically.
- Your Microsoft Lens should appear on the BlueStacks home screen.
- You need to find a reliable source for the Microsoft Lens APK and then download it safely:

Method – 2: Download and Install Microsoft Lens using LDPlayer
If you don’t want to install the Bluestacks Android emulator but still want to enjoy and download Microsoft Lens for PC, then here is another emulator you can download. LDPlayer is another Android emulator that you can use. Just follow the steps below to install the Microsoft Lens:
Step 1: Download and Install LDPlayer:
First, you have to download LDPlayer on your PC. You can visit the official website of LDPlayer and download it from there or download it from the link below.
Run the installer and follow the on-screen instructions to complete the installation.
Step 2: Set Up LDPlayer:
Launch LDPlayer after installation.
Once the LDPlayer emulator is launched, open the Google Play Store within LDPlayer. Sign in with your Google account to access the Google Play Store. You can use a Gmail account to do so but if you don’t have a Gmail account, then you need to create one.
Step 3: Install Microsoft Lens App:
- Via Google Play Store:
- Open the Google Play Store app within LDPlayer.
- Search for the Microsoft Lens app.
- Click “Install” to download and install the Microsoft Lens app.
- Look for Microsoft Lens icon created on the LDPlayer emulator homepage.
- Via APK Files:
- You need to find a reliable source for the Microsoft Lens APK and then download it safely:
- Drag and drop the downloaded Microsoft Lens APK file directly onto the LDPlayer window.
- Alternatively, use the “Install APK” feature:
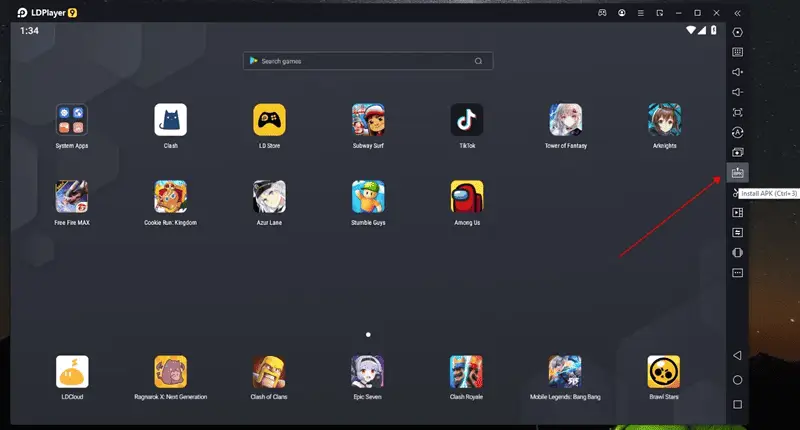
- Click on the “Install APK” button (usually a toolbar icon) or press Ctrl + 3.
- Locate the downloaded Microsoft Lens APK file on your PC and select it.
- LDPlayer will install the app automatically.
- Your Microsoft Lens should appear on the LDPlayer home screen.
- You need to find a reliable source for the Microsoft Lens APK and then download it safely:
Method – 3: Download and Install Microsoft Lens using NoxPlayer
There is another emulator that you can use to run Microsoft Lens on Windows. NoxPlayer will help you to do so.
Step 1: Download and Install NoxPlayer:
First, you have to download NoxPlayer on your PC. You can visit the official website of NoxPlayer and download it from there or download it from the link below.
Run the installer and follow the on-screen instructions to complete the installation.
Step 2: Set Up NoxPlayer:
Launch NoxPlayer after installation.
Once the NoxPlayer emulator is launched, open the Google Play Store within NoxPlayer. Sign in with your Google account to access the Google Play Store. You can use a Gmail account to do so but if you don’t have a Gmail account, then you need to create one.
Step 3: Install Microsoft Lens App:
- Via Google Play Store:
- Open the Google Play Store app within NoxPlayer.
- Search for the Microsoft Lens app.
- Click “Install” to download and install the Microsoft Lens app.
- Look for Microsoft Lens icon created on the NoxPlayer emulator homepage.
- Via APK Files:
- You need to find a reliable source for the Microsoft Lens APK and then download it safely:
- Drag and drop the downloaded Microsoft Lens APK file directly onto the NoxPlayer window.
- Alternatively, use the “Install APK” feature:
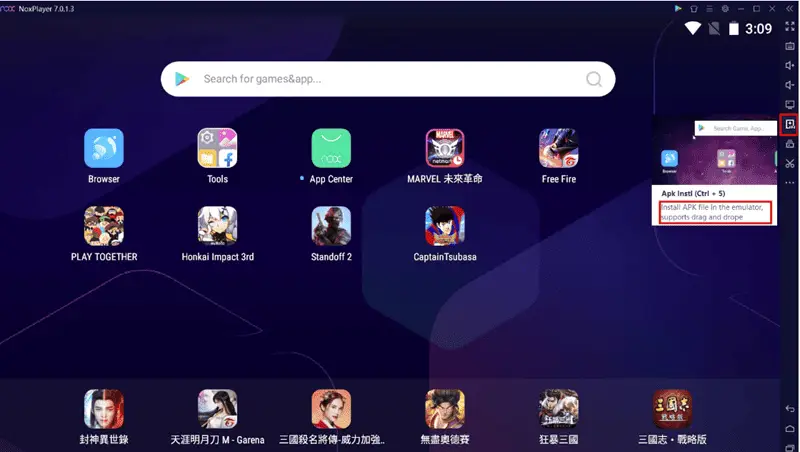
- Click on the “Install APK” button (usually a toolbar icon) or press Ctrl + 5.
- Locate the downloaded Microsoft Lens APK file on your PC and select it.
- NoxPlayer will install the app automatically.
- Your Microsoft Lens should appear on the NoxPlayer home screen.
- You need to find a reliable source for the Microsoft Lens APK and then download it safely:
Microsoft Lens App not available on Google Play Store?
You must have noticed that in all the above-mentioned methods, we are downloading Microsoft Lens from the Play Store. However, sometimes it can happen that due to geolocation restrictions, Microsoft Lens might not be available in your region. So, what to do in that kind of situation? Well, here is another trick for you to run and install Microsoft Lens on PC without geo-restriction or Google Play Store.
Pre-requisite
Before moving forward, you need to download the Microsoft Lens APK file from a reliable, credible and trustworthy third-party website to run it on your PC if it is unavailable on the Google Play Store.
We strongly recommend against downloading or installing applications from third-party sources. Such apps may pose security risks, compromise your personal data, or violate app store policies. For your safety and to ensure optimal performance, please use official app stores such as the Google Play Store or the Apple App Store for all downloads.
Procedure
Follow the steps to run the downloaded Microsoft Lens APK file on PC, We are using BlueStacks for this tutorial:
Step 1: Download and install Bluestacks or Nox Player or LDPlayer, steps and links are mentioned in Method 1, Method 2 and Method 3.
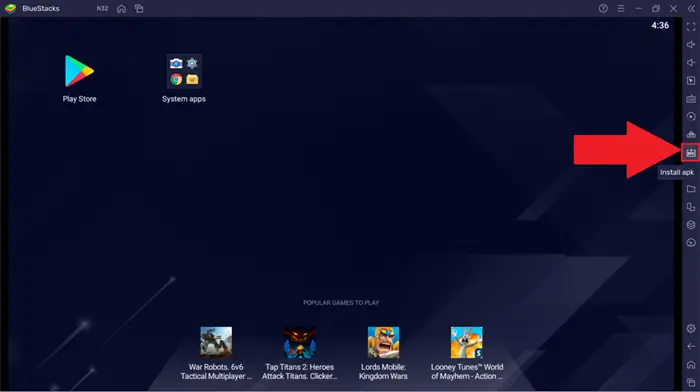
Step 2: Launch Bluestacks on your computer. Now, head over to the “Install APK” button which is on the right sidebar as shown in the image below.
Step 3: A Windows Explorer pop-up will come up. Navigate to the downloaded Microsoft Lens APK file location. Now select the Microsoft Lens APK and click on open. The app installation will begin and once the installation is complete, the app will appear on the BlueStacks home screen.
OR
Step 3: You can simply navigate to the Microsoft Lens APK file location and drag the downloaded Microsoft Lens APK to BlueStacks. The installation will begin, and once completed, the app will appear on the BlueStacks home screen.
Alternative Apps to Microsoft Lens:
- Adobe Scan: Offers high-quality document scanning, OCR capabilities, and integration with Adobe Acrobat for editing and sharing PDFs.
- CamScanner: Provides advanced scanning features, annotations, OCR, and cloud storage options, with options for editing and organizing scans.
- Google Drive: Includes a built-in scanning feature that allows users to digitize documents directly within the app and save as PDFs or images.
- Evernote Scannable: Focuses on quick scanning and saving notes or business cards, with easy integration into Evernote’s note-taking ecosystem.
- TurboScan: Known for fast and accurate document scanning with multi-page support and image enhancement tools.