In this tutorial, I will tell you how to download Notebook for PC. Notebook offers beautifully simple note-taking and is an app on Google Playstore and iOS store. However, I will tell you how to download Notebook for PC in this article.
The Notebook App – Never lose your notes again. With the Notebook App, you can easily jot down notes and keep everything you need at your fingertips. This is a stylish and convenient note-taking application that helps you make notes, manage your work, remember events, and organize your thoughts! Whether you are a student, an entrepreneur, or just someone who wants to be more organized, the Notebook App is ideal for you.
The Notebook App enables you to customize your notes with a range of fonts, colors, and styles. You may also want to include bullets, headings, and highlights in your notes to make them aesthetically appealing and readable. It also supports multimedia, so you can add pictures, sound recordings, sketches, and notes in other languages.
A great classification & organization system is offered by the Notebook App. With customized folders, you can appropriately categorize notes, allowing you to find relevant notes in minutes when needed. The app features a strong search system so you can find your notes easily by words or tags. The Notebook application offers real-time sharing features for the collaborative aspect, which I like when I’m working with others.
Features of Notebook App
- Note Creation: Easily create new notes in various formats (text, lists, etc.).
- Rich Text Formatting: Apply styles (bold, italic, underline) and formatting options.
- Multimedia Support: Attach images, audio recordings, and videos to notes.
- Organization Tools: Create folders or notebooks to categorize notes efficiently.
- Search Functionality: Search notes by keywords or tags for quick access.
- Sync Across Devices: Sync notes with cloud services for access on different devices.
- Offline Access: Write and edit notes without an internet connection.
- Reminders and Alarms: Set up reminders for your notes and tasks.
- Customization Options: Change themes, fonts, and backgrounds to personalize the app.
- Collaboration Features: Share notes with others for group projects or collective brainstorming.
- Voice Recognition: Support for voice-to-text input for hands-free note-taking.
- Backup and Restore: Features to back up your notes to prevent data loss.
- PDF Export/Import: Import and export notes in PDF format for easy sharing.
- Widgets: Home screen widgets for quick note access or a summary view.
Due to the popularity of Android and iOS devices, many apps are made only for these platforms and very few for Windows and PCs. Even if Notebook may not be available for PC or Windows but only on the Google Play Store or iOS App Store, there are still some tricks and tips that can help you download Notebook for PC. You can take the help of Android emulators to install and download Notebook for PC. This article will help you navigate how to download Notebook for PC.
Download & Install Notebook on PC:
If you want to run Android apps on your PC without any software, then you can read this tutorial: How to Install Android Apps on PC without any Software? Alternatively, you can run Android apps like Notebook via Android Emulators like BlueStacks, LDPlayer and NoxPlayer.
Or, you can download APK files on your PC, you need to find a reliable source for the APK and then download it safely. Just follow the various methods and steps listed in this article to Download Notebook for PC and Notebook will run on your PC without any problem.
Please note that we are strongly against downloading or installing applications from third-party sources. Such apps may pose security risks, compromise your personal data, or violate app store policies. For your safety and to ensure optimal performance, please use official app stores such as the Google Play Store or the Apple App Store for all downloads.
Method – 1: Download and Install Notebook using Bluestacks
As I told you before, the Notebook app is not available for PC but you can still download Notebook for PC using a Bluestacks emulator. BlueStacks is an Android emulator that lets you run Android apps on a computer. Just follow the steps below to properly download and install Notebook on your PC:
Step 1: Download and Install BlueStacks:
First, you have to download BlueStacks on your PC. You can visit the official website of Bluestacks and download it from there or download it from the link below.
Run the installer and follow the on-screen instructions to complete the installation.
Step 2: Set Up BlueStacks:
Launch BlueStacks after installation.
Once the Bluestacks emulator is launched, open the Google Play Store within BlueStacks. Sign in with your Google account to access the Google Play Store. You can use a Gmail account to do so but if you don’t have a Gmail account, then you need to create one.
Step 3: Install Notebook App:
- Via Google Play Store:
- Open the Google Play Store app within BlueStacks.
- Search for the Notebook app.
- Click “Install” to download and install the Notebook app.
- Look for Notebook icon created on the Bluestacks emulator homepage.
- Via APK Files:
- You need to find a reliable source for the Notebook APK and then download it safely:
- Drag and drop the downloaded Notebook APK file directly onto the BlueStacks window.
- Alternatively, use the “Install APK” feature:
- Click on the “Install APK” button (usually a toolbar icon) or press Ctrl + Shift + B.
- Locate the downloaded Notebook APK file on your PC and select it.
- BlueStacks will install the app automatically.
- Your Notebook should appear on the BlueStacks home screen.
- You need to find a reliable source for the Notebook APK and then download it safely:

Method – 2: Download and Install Notebook using LDPlayer
If you don’t want to install the Bluestacks Android emulator but still want to enjoy and download Notebook for PC, then here is another emulator you can download. LDPlayer is another Android emulator that you can use. Just follow the steps below to install the Notebook:
Step 1: Download and Install LDPlayer:
First, you have to download LDPlayer on your PC. You can visit the official website of LDPlayer and download it from there or download it from the link below.
Run the installer and follow the on-screen instructions to complete the installation.
Step 2: Set Up LDPlayer:
Launch LDPlayer after installation.
Once the LDPlayer emulator is launched, open the Google Play Store within LDPlayer. Sign in with your Google account to access the Google Play Store. You can use a Gmail account to do so but if you don’t have a Gmail account, then you need to create one.
Step 3: Install Notebook App:
- Via Google Play Store:
- Open the Google Play Store app within LDPlayer.
- Search for the Notebook app.
- Click “Install” to download and install the Notebook app.
- Look for Notebook icon created on the LDPlayer emulator homepage.
- Via APK Files:
- You need to find a reliable source for the Notebook APK and then download it safely:
- Drag and drop the downloaded Notebook APK file directly onto the LDPlayer window.
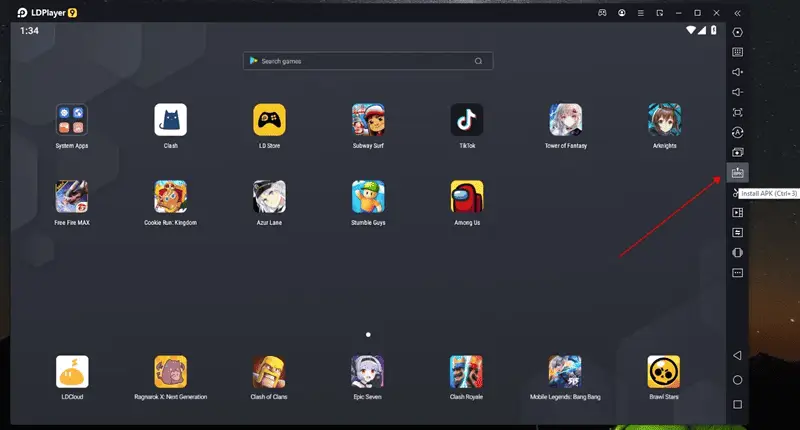
- Alternatively, use the “Install APK” feature:
- Click on the “Install APK” button (usually a toolbar icon) or press Ctrl + 3.
- Locate the downloaded Notebook APK file on your PC and select it.
- LDPlayer will install the app automatically.
- Your Notebook should appear on the LDPlayer home screen.
- You need to find a reliable source for the Notebook APK and then download it safely:
Method – 3: Download and Install Notebook using NoxPlayer
There is another emulator that you can use to run Notebook on Windows. NoxPlayer will help you to do so.
Step 1: Download and Install NoxPlayer:
First, you have to download NoxPlayer on your PC. You can visit the official website of NoxPlayer and download it from there or download it from the link below.
Run the installer and follow the on-screen instructions to complete the installation.
Step 2: Set Up NoxPlayer:
Launch NoxPlayer after installation.
Once the NoxPlayer emulator is launched, open the Google Play Store within NoxPlayer. Sign in with your Google account to access the Google Play Store. You can use a Gmail account to do so but if you don’t have a Gmail account, then you need to create one.
Step 3: Install Notebook App:
- Via Google Play Store:
- Open the Google Play Store app within NoxPlayer.
- Search for the Notebook app.
- Click “Install” to download and install the Notebook app.
- Look for Notebook icon created on the NoxPlayer emulator homepage.
- Via APK Files:
- You need to find a reliable source for the Notebook APK and then download it safely:
- Drag and drop the downloaded Notebook APK file directly onto the NoxPlayer window.
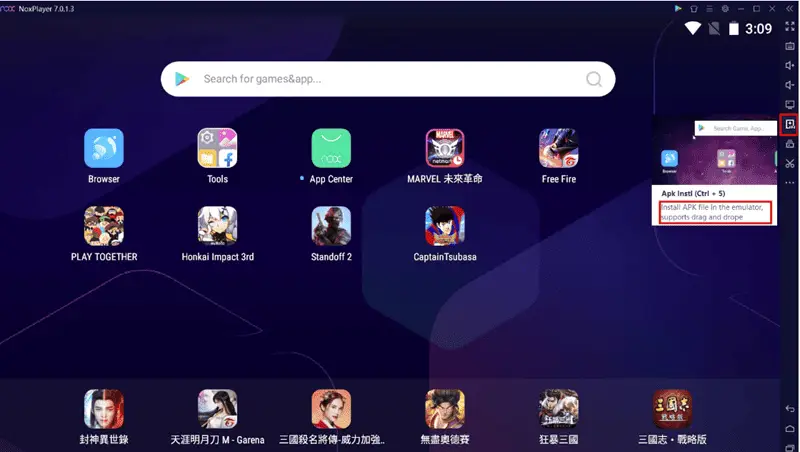
- Alternatively, use the “Install APK” feature:
- Click on the “Install APK” button (usually a toolbar icon) or press Ctrl + 5.
- Locate the downloaded Notebook APK file on your PC and select it.
- NoxPlayer will install the app automatically.
- Your Notebook should appear on the NoxPlayer home screen.
- You need to find a reliable source for the Notebook APK and then download it safely:
Notebook App not available on Google Play Store?
You must have noticed that in all the above-mentioned methods, we are downloading Notebook from the Play Store. However, sometimes it can happen that due to geolocation restrictions, Notebook might not be available in your region. So, what to do in that kind of situation? Well, here is another trick for you to run and install Notebook on PC without geo-restriction or Google Play Store.
Pre-requisite
Before moving forward, you need to download the Notebook APK file from a reliable, credible and trustworthy third-party website to run it on your PC if it is unavailable on the Google Play Store.
We strongly recommend against downloading or installing applications from third-party sources. Such apps may pose security risks, compromise your personal data, or violate app store policies. For your safety and to ensure optimal performance, please use official app stores such as the Google Play Store or the Apple App Store for all downloads.
Procedure
Follow the steps to run the downloaded Notebook APK file on PC, We are using BlueStacks for this tutorial:
Step 1: Download and install Bluestacks or Nox Player or LDPlayer, steps and links are mentioned in Method 1, Method 2 and Method 3.
Step 2: Launch Bluestacks on your computer. Now, head over to the “Install APK” button which is on the right sidebar as shown in the image below.
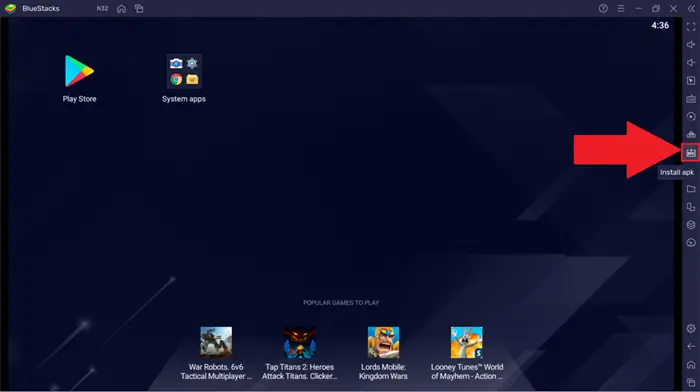
Step 3: A Windows Explorer pop-up will come up. Navigate to the downloaded Notebook APK file location. Now select the Notebook APK and click on open. The app installation will begin and once the installation is complete, the app will appear on the BlueStacks home screen.
OR
Step 3: You can simply navigate to the Notebook APK file location and drag the downloaded Notebook APK to BlueStacks. The installation will begin, and once completed, the app will appear on the BlueStacks home screen.
Alternative Apps to Notebook App
- Evernote: A popular note-taking app that offers rich features like tagging, web clipping, and cross-device syncing.
- Microsoft OneNote: A powerful platform for note-taking that integrates well with other Microsoft Office products.
- Google Keep: A simple, easy-to-use app for quick notes and reminders with collaboration options.
- Notion: An all-in-one workspace that combines note-taking with task management and database features.
- Bear: A beautifully designed note-taking app focused on Markdown support, primarily for Apple devices, but has great usability.
- Simplenote: A minimalist note-taking app that syncs your notes across devices without distractions.
- Zoho Notebook: A visually appealing note-taking app that supports multimedia notes and organization via notebooks.
- JotterPad: A plain text editor for creative writing with Markdown support and distraction-free writing mode.
- ColorNote: A versatile note-taking app that allows you to create notes and checklists with simple color-coding features.
- Turtl: An open-source note-taking app that focuses on privacy and encryption for your notes.