In this tutorial, I will tell you how to download JotterPad for PC. JotterPad offers all-encompassing writing tool for writers, screenwriters, screenplay writers, authors, book writers, bloggers and storytellers of all kinds and is an app on Google Playstore and iOS store. However, I will tell you how to download JotterPad for PC in this article.
For Android handsets, you’re somewhat spoilt for choice, but JotterPad is a solid writing app. By using both function and design together, JotterPad is a super cool user interface design in which you can work without traditional tools. Whether they’re jotting down a few thoughts or penning a novel, essay, or another piece of writing, the app will keep writers on their toes.
The markdown support in JotterPad is perfect and lets you convert as you write, if you need. The fact that one can generate structured documents of headings, lists, and links, and reduce the cognitive burden of the writer while writing, without breaking his/her flow. It comes with a distraction-free mode where it hides all the unwanted options and tools to keep the focus on. For users who are on the move, the offline feature is a bonus, allowing you to compose and edit without being connected to the internet.
JotterPad To collaboration and organization, JotterPad can help in those departments. It is also compatible with Google Drive and Dropbox cloud storage, hence you can sync work across devices. Additionally, it offers strong file management, which helps writers to group their drafts, notes, and ideas in folders for better organization. JotterPad has a built-in thesaurus and dictionary that can help you write better or improve your vocabulary.
Features of JotterPad App
- Distraction-Free Editing: A clean and minimalist interface that allows writers to focus solely on their work without unnecessary distractions.
- Markdown Support: Allows users to format their text using Markdown, making it easier to prepare content for publishing.
- Typewriter Mode: A mode that keeps the line you are currently working on in the center of the screen for improved focus.
- Vanilla Typography: Offers a variety of font styles and sizes to enhance the writing experience.
- Cloud Integration: Syncs with cloud storage services like Google Drive, Dropbox, and more for easy access to your documents.
- Word and Character Count: Includes tools for tracking word count, character count, and other statistics.
- Customizable Themes: Users can choose from different themes and color schemes to personalize their writing experience.
- Export Options: Provides options to export documents in various formats, like TXT, PDF, and Markdown.
- Version Control: Saves multiple versions of documents, allowing users to revert to previous drafts if necessary.
- Built-in Dictionary and Thesaurus: Helps writers find synonyms and definitions without leaving the app.
- In-app Purchases: Offers additional features and functionalities through in-app purchases for premium users.
Due to the popularity of Android and iOS devices, many apps are made only for these platforms and very few for Windows and PCs. Even if JotterPad may not be available for PC or Windows but only on the Google Play Store or iOS App Store, there are still some tricks and tips that can help you download JotterPad for PC. You can take the help of Android emulators to install and download JotterPad for PC. This article will help you navigate how to download JotterPad for PC.
Download & Install JotterPad on PC:
If you want to run Android apps on your PC without any software, then you can read this tutorial: How to Install Android Apps on PC without any Software? Alternatively, you can run Android apps like JotterPad via Android Emulators like BlueStacks, LDPlayer and NoxPlayer.
Or, you can download APK files on your PC, you need to find a reliable source for the APK and then download it safely. Just follow the various methods and steps listed in this article to Download JotterPad for PC and JotterPad will run on your PC without any problem.
Please note that we are strongly against downloading or installing applications from third-party sources. Such apps may pose security risks, compromise your personal data, or violate app store policies. For your safety and to ensure optimal performance, please use official app stores such as the Google Play Store or the Apple App Store for all downloads.
Method – 1: Download and Install JotterPad using Bluestacks
As I told you before, the JotterPad app is not available for PC but you can still download JotterPad for PC using a Bluestacks emulator. BlueStacks is an Android emulator that lets you run Android apps on a computer. Just follow the steps below to properly download and install JotterPad on your PC:
Step 1: Download and Install BlueStacks:
First, you have to download BlueStacks on your PC. You can visit the official website of Bluestacks and download it from there or download it from the link below.
Run the installer and follow the on-screen instructions to complete the installation.
Step 2: Set Up BlueStacks:
Launch BlueStacks after installation.
Once the Bluestacks emulator is launched, open the Google Play Store within BlueStacks. Sign in with your Google account to access the Google Play Store. You can use a Gmail account to do so but if you don’t have a Gmail account, then you need to create one.
Step 3: Install JotterPad App:
- Via Google Play Store:
- Open the Google Play Store app within BlueStacks.
- Search for the JotterPad app.
- Click “Install” to download and install the JotterPad app.
- Look for JotterPad icon created on the Bluestacks emulator homepage.
- Via APK Files:
- You need to find a reliable source for the JotterPad APK and then download it safely:
- Drag and drop the downloaded JotterPad APK file directly onto the BlueStacks window.
- Alternatively, use the “Install APK” feature:
- Click on the “Install APK” button (usually a toolbar icon) or press Ctrl + Shift + B.
- Locate the downloaded JotterPad APK file on your PC and select it.
- BlueStacks will install the app automatically.
- Your JotterPad should appear on the BlueStacks home screen.
- You need to find a reliable source for the JotterPad APK and then download it safely:

Method – 2: Download and Install JotterPad using LDPlayer
If you don’t want to install the Bluestacks Android emulator but still want to enjoy and download JotterPad for PC, then here is another emulator you can download. LDPlayer is another Android emulator that you can use. Just follow the steps below to install the JotterPad:
Step 1: Download and Install LDPlayer:
First, you have to download LDPlayer on your PC. You can visit the official website of LDPlayer and download it from there or download it from the link below.
Run the installer and follow the on-screen instructions to complete the installation.
Step 2: Set Up LDPlayer:
Launch LDPlayer after installation.
Once the LDPlayer emulator is launched, open the Google Play Store within LDPlayer. Sign in with your Google account to access the Google Play Store. You can use a Gmail account to do so but if you don’t have a Gmail account, then you need to create one.
Step 3: Install JotterPad App:
- Via Google Play Store:
- Open the Google Play Store app within LDPlayer.
- Search for the JotterPad app.
- Click “Install” to download and install the JotterPad app.
- Look for JotterPad icon created on the LDPlayer emulator homepage.
- Via APK Files:
- You need to find a reliable source for the JotterPad APK and then download it safely:
- Drag and drop the downloaded JotterPad APK file directly onto the LDPlayer window.
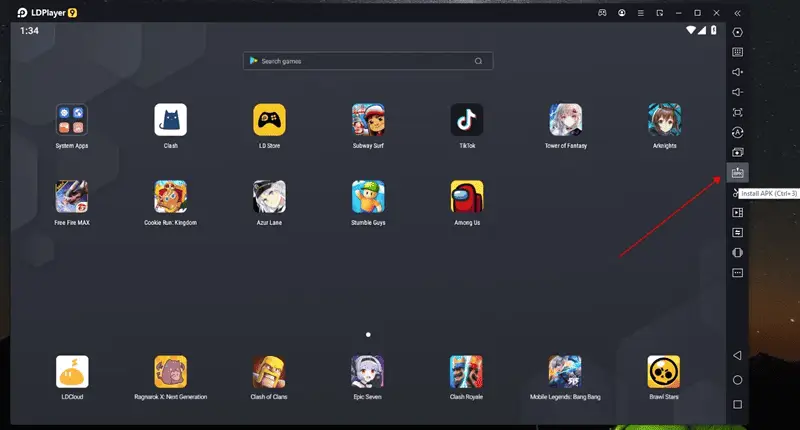
- Alternatively, use the “Install APK” feature:
- Click on the “Install APK” button (usually a toolbar icon) or press Ctrl + 3.
- Locate the downloaded JotterPad APK file on your PC and select it.
- LDPlayer will install the app automatically.
- Your JotterPad should appear on the LDPlayer home screen.
- You need to find a reliable source for the JotterPad APK and then download it safely:
Method – 3: Download and Install JotterPad using NoxPlayer
There is another emulator that you can use to run JotterPad on Windows. NoxPlayer will help you to do so.
Step 1: Download and Install NoxPlayer:
First, you have to download NoxPlayer on your PC. You can visit the official website of NoxPlayer and download it from there or download it from the link below.
Run the installer and follow the on-screen instructions to complete the installation.
Step 2: Set Up NoxPlayer:
Launch NoxPlayer after installation.
Once the NoxPlayer emulator is launched, open the Google Play Store within NoxPlayer. Sign in with your Google account to access the Google Play Store. You can use a Gmail account to do so but if you don’t have a Gmail account, then you need to create one.
Step 3: Install JotterPad App:
- Via Google Play Store:
- Open the Google Play Store app within NoxPlayer.
- Search for the JotterPad app.
- Click “Install” to download and install the JotterPad app.
- Look for JotterPad icon created on the NoxPlayer emulator homepage.
- Via APK Files:
- You need to find a reliable source for the JotterPad APK and then download it safely:
- Drag and drop the downloaded JotterPad APK file directly onto the NoxPlayer window.
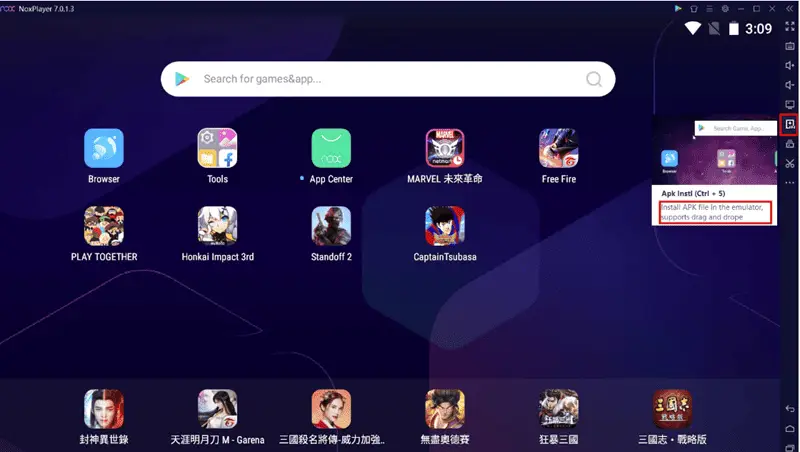
- Alternatively, use the “Install APK” feature:
- Click on the “Install APK” button (usually a toolbar icon) or press Ctrl + 5.
- Locate the downloaded JotterPad APK file on your PC and select it.
- NoxPlayer will install the app automatically.
- Your JotterPad should appear on the NoxPlayer home screen.
- You need to find a reliable source for the JotterPad APK and then download it safely:
JotterPad App not available on Google Play Store?
You must have noticed that in all the above-mentioned methods, we are downloading JotterPad from the Play Store. However, sometimes it can happen that due to geolocation restrictions, JotterPad might not be available in your region. So, what to do in that kind of situation? Well, here is another trick for you to run and install JotterPad on PC without geo-restriction or Google Play Store.
Pre-requisite
Before moving forward, you need to download the JotterPad APK file from a reliable, credible and trustworthy third-party website to run it on your PC if it is unavailable on the Google Play Store.
We strongly recommend against downloading or installing applications from third-party sources. Such apps may pose security risks, compromise your personal data, or violate app store policies. For your safety and to ensure optimal performance, please use official app stores such as the Google Play Store or the Apple App Store for all downloads.
Procedure
Follow the steps to run the downloaded JotterPad APK file on PC, We are using BlueStacks for this tutorial:
Step 1: Download and install Bluestacks or Nox Player or LDPlayer, steps and links are mentioned in Method 1, Method 2 and Method 3.
Step 2: Launch Bluestacks on your computer. Now, head over to the “Install APK” button which is on the right sidebar as shown in the image below.
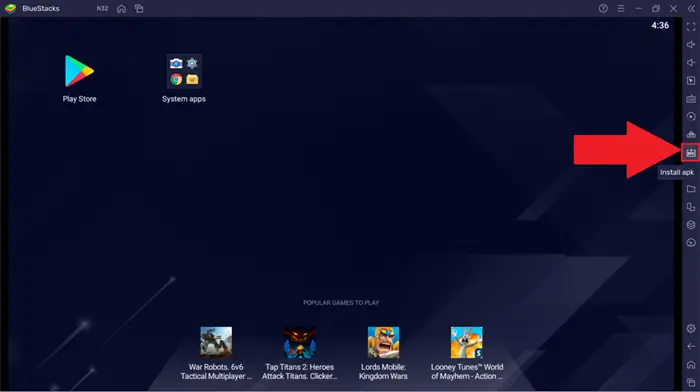
Step 3: A Windows Explorer pop-up will come up. Navigate to the downloaded JotterPad APK file location. Now select the JotterPad APK and click on open. The app installation will begin and once the installation is complete, the app will appear on the BlueStacks home screen.
OR
Step 3: You can simply navigate to the JotterPad APK file location and drag the downloaded JotterPad APK to BlueStacks. The installation will begin, and once completed, the app will appear on the BlueStacks home screen.
Alternative Apps to JotterPad
- Evernote: A popular note-taking app that allows users to capture, organize, and store notes, documents, and images.
- Google Docs: A cloud-based word processor that offers collaborative editing, making it easy for teams to work together on documents.
- Microsoft Word: A classic word processing tool with robust features for formatting and editing text, widely used across various platforms.
- Werdsmith: A writing app designed for authors, offering tools for organizing writing projects, inspiring prompts, and a clean writing interface.
- Scrivener: Although more focused on long-form writing projects (like novels or research papers), it offers excellent organizational features.
- Bear: A note-taking app with a beautiful interface and Markdown support, great for both note-taking and writing longer texts.
- Ulysses: A writing app for Mac and iOS with a clean interface, powerful organizational tools, and seamless iCloud syncing.
- Simplenote: A straightforward, no-frills writing app that syncs across devices, perfect for quick notes and simple writing.
- FocusWriter: A distraction-free writing environment for desktop users, featuring customizable themes and backgrounds.
- Notion: An all-in-one workspace that combines note-taking, project management, and collaboration tools.